前置知识
vue-loader基本知识
vue-loader作用:允许你以一种名为单文件组件(SFC)的格式撰写Vue组件
block(块):vue组件里包含
template、script、style、custom blocks这几部分,我们称之为“块”。一个vue组件里可以包含多个
style块、custom块。每个块都可以使用不同的loader来处理,比如:
1 | <template lang="pug"></template> |
webpack里可以设置相应的loader来处理这些块,比如pug-plain-loader、sass-loader等。
- 支持函数式组件
1 | <template functional> |
webpack loader基本知识
vue-loader与webpack loader密切相关,我们首先看一下webpack loader的执行过程。
每个loader上都可以有一个.pitch方法,loader的处理过程分为两个阶段,pitch阶段和normal执行阶段:
第一步先进行pitch阶段:会先按顺序执行每个loader的pitch方法;
第二步按相反顺序进行normal执行阶段
如果loader的pitch方法有返回值,则直接掉头往相反顺序执行。参考官网例子(pitching loader):
1 | module.exports = { |
上面例子中各个loader的执行顺序如下:
1 | |- a-loader `pitch` |
如果b-loader返回了内容,则执行顺序如下:
1 | |- a-loader `pitch` |
vue-loader在webpack流程中的位置

图中黄色部分就是vue-loader所涉及的内容,也就是我们这篇文章要分析的。
输入与输出
接下来,我们将通过一个例子,来看vue-loader是怎么工作的(这个例子来自vue-loader/example/)。
1 | // main.js |
1 | // source.vue |
1 | // webpack.config.js |
对于上述例子,vue-loader的输出结果是:
1 | // template |
源码结构
首先看一下vue-loader源码结构:
1 | vue-loader/lib/ |
vue-loader-plugin
在webpack开始执行后,会先合并webpack.config里的配置,接着实例化compiler,然后就去挨个执行所有plugin的apply方法。请看webpack这部分源码:
1 | // webpack/lib/webpack.js |
从例子中看到,我们的webpack配置了vue-loader-plugin,也就是源码里的vue-loader/lib/plugin.js,这是vue-loader强依赖的,如果不配置vue-loader-plugin,就会抛出错误。根据上面wbepack执行过程,在执行vue-loader核心代码之前,会先经过vue-loader-plugin。那么它到底做了哪些事情?
1 | // vue-loader/lib/plugin.js |
从上面源码可以看出,vue-loader-plugin导出的是一个类,并且只包含了一个apply方法。这个apply方法就是被webpack调用的。
apply方法其实就做了3件事:
事件监听:在normalModuleLoader钩子执行前调用代码:loaderContext[NS] = true
(每解析一个module,都会用到normalModuleLoader,由于每解析一个module都会有一个新的loaderContext,vue-loader/lib/index.js会判断loaderContext[NS]的值,为保证经过vue-loader执行时不报错,需要在这里标记loaderContext[NS] = true。)说明:loader中的this是一个叫做loaderContext的对象,这是webpack提供的,是loader的上下文对象,里面包含loader可以访问的方法或属性。
将webpack中配置的rules利用webpack的new RuleSet进行格式化(rules配置),并clone一份rules给.vue文件里的每个block使用。
1
2
3
4
5
6
7
8
9
10
11
12
13
14
15
16
17
18
19
20
21
22
23
24
25
26
27
28
29
30
31
32
33
34
35rules = [{
resource: f (),
use: [{
loader: "vue-loader",
options: undefined
}]
}, {
resourceQuery: f (),
use: [{
loader: "babel-loader",
options: undefined
}]
}, {
resourceQuery: f (),
use: [{
loader: "babel-loader",
options: undefined
}]
}, {
resource: ƒ (),
oneOf: [{
resourceQuery: ƒ (),
use: [{
loader: "pug-plain-loader", options: undefined
}]
}, {
use: [{
loader: "raw-loader",
options: undefined
}, {
loader: "pug-plain-loader",
options: undefined
}]
}]
}]在rules里加入vue-loader内部提供的rule(暂且称为pitcher-rule),其对应的loader是pitcher-loader,同时将原始的rules替换成pitcher-rule、cloneRules、rules。至于pitcher-rule、pitcher-loader做了什么,我们后面再讲。
放一张图总结下vue-loader-plugin的整体流程:

vue-loader
当webpack加载入口文件main.js时,依赖到了source.vue,webpack内部会匹配source.vue的loaders,发现是vue-loader,然后就会去执行vue-loader(vue-loader/lib/index.js)。接下来,我们分析vue-loader的实现过程。
1 | // vue-loader/lib/index.js |
vue-loader整体流程图:

可以看出,整个过程大体可以分为3个阶段。
第一阶段
这一阶段是将.vue文件解析成js代码。
会先判断是否加载了vue-loader-plugin,没有则报错
1
2
3if (!errorEmitted && !loaderContext['thread-loader'] && !loaderContext[NS]) {
// 略
}从loaderContext中获取到模块的信息,比如request、resourcePath、resourceQuery等
1
2
3
4
5
6
7
8
9const {
target, // 编译的目标,是从webpack配置中传递过来的,默认是'web',也可以是'node'等
request, // 请求的资源的路径(每个资源都有一个路径)
minimize, // 是否压缩:true/false,现在已废弃
sourceMap, // 是否生成sourceMap: true/false
rootContext, // 当前项目绝对路径,对本例子来说是:/Users/zhangxixi/knowledge collect/vue-loader
resourcePath, // 资源文件的绝对路径,对本例子来说是:/Users/zhangxixi/knowledge collect/vue-loader/example/source.vue
resourceQuery // 资源的 query 参数,也就是问号及后面的,如 ?vue&type=custom&index=0&blockType=foo
} = loaderContext对.vue文件进行parse,其实就是把.vue分成template、script、style、customBlocks这几部分
1
2
3
4
5
6
7const descriptor = parse({
source,
compiler: options.compiler || loadTemplateCompiler(loaderContext), // 如果loader的options没有配置compiler, 则使用vue-template-compiler
filename,
sourceRoot,
needMap: sourceMap
})这一阶段最关键的就是parse过程,parse前后对比如下:
1
2
3
4
5
6
7
8
9
10
11
12
13
14
15
16
17
18
19
20
21
22
23
24
25
26
27
28
29
30
31
32
33
34
35
36
37
38
39
40
41
42
43
44
45
46
47
48
49
50// parse之前 source是:
'<template lang="pug">\ndiv(ok)\n h1(:class="$style.red") hello\n</template>\n\n<script>\nexport default {\n data () {\n return {\n msg: \'fesfff\'\n }\n }\n}\n</script>\n\n<style scoped>\n.red {\n color: red;\n}\n</style>\n\n<foo>\nexport default comp => {\n console.log(comp.options.data())\n}\n</foo>\n'
// parse之后 得到的结果
{
template:
{ type: 'template',
content: '\ndiv(ok)\n h1(:class="$style.red") hello\n',
start: 21,
attrs: { lang: 'pug' },
lang: 'pug',
end: 62
},
script:
{ type: 'script',
content:
'//\n//\n//\n//\n//\n\nexport default {\n data () {\n return {\n msg: \'fesfff\'\n }\n }\n}\n',
start: 83,
attrs: {},
end: 158,
map:
{ version: 3,
sources: [Array],
names: [],
mappings: ';;;;;;AAMA;AACA;AACA;AACA;AACA;AACA;AACA',
file: 'source.vue',
sourceRoot: 'example',
sourcesContent: [Array] }
},
styles:
[ { type: 'style',
content: '\n\n\n\n\n\n\n\n\n\n\n\n\n\n\n\n.red {\n color: red;\n}\n',
start: 183,
attrs: [Object],
scoped: true,
end: 207,
map: [Object]
}
],
customBlocks:
[ { type: 'foo',
content:
'\n\n\n\n\n\n\n\n\n\n\n\n\n\n\n\n\n\n\n\n\n\nexport default comp => {\n console.log(comp.options.data())\n}\n',
start: 222,
attrs: {},
end: 285
}
],
errors: []
}然后区分.vue请求与block请求(请求source.vue就是.vue请求,source.vue里依赖了template、script等block,那么这些依赖会被解析成.source.vue?vue&type=template这种带query的,我们称之为block请求)。如果是.vue请求,则需要生成js module。否则就执行selectBlock。第一阶段是.vue请求,因此会生成js module:分别生成template、script、style、customBlock的请求路径(这里会在query上添加’vue’,比如./source.vue?vue&type=script&lang=js,这会在第二阶段用到);添加热加载逻辑。
vue-loader第一阶段生成的js代码如下:
1 | import { render, staticRenderFns } from "./source.vue?vue&type=template&id=27e4e96e&scoped=true&lang=pug&" |

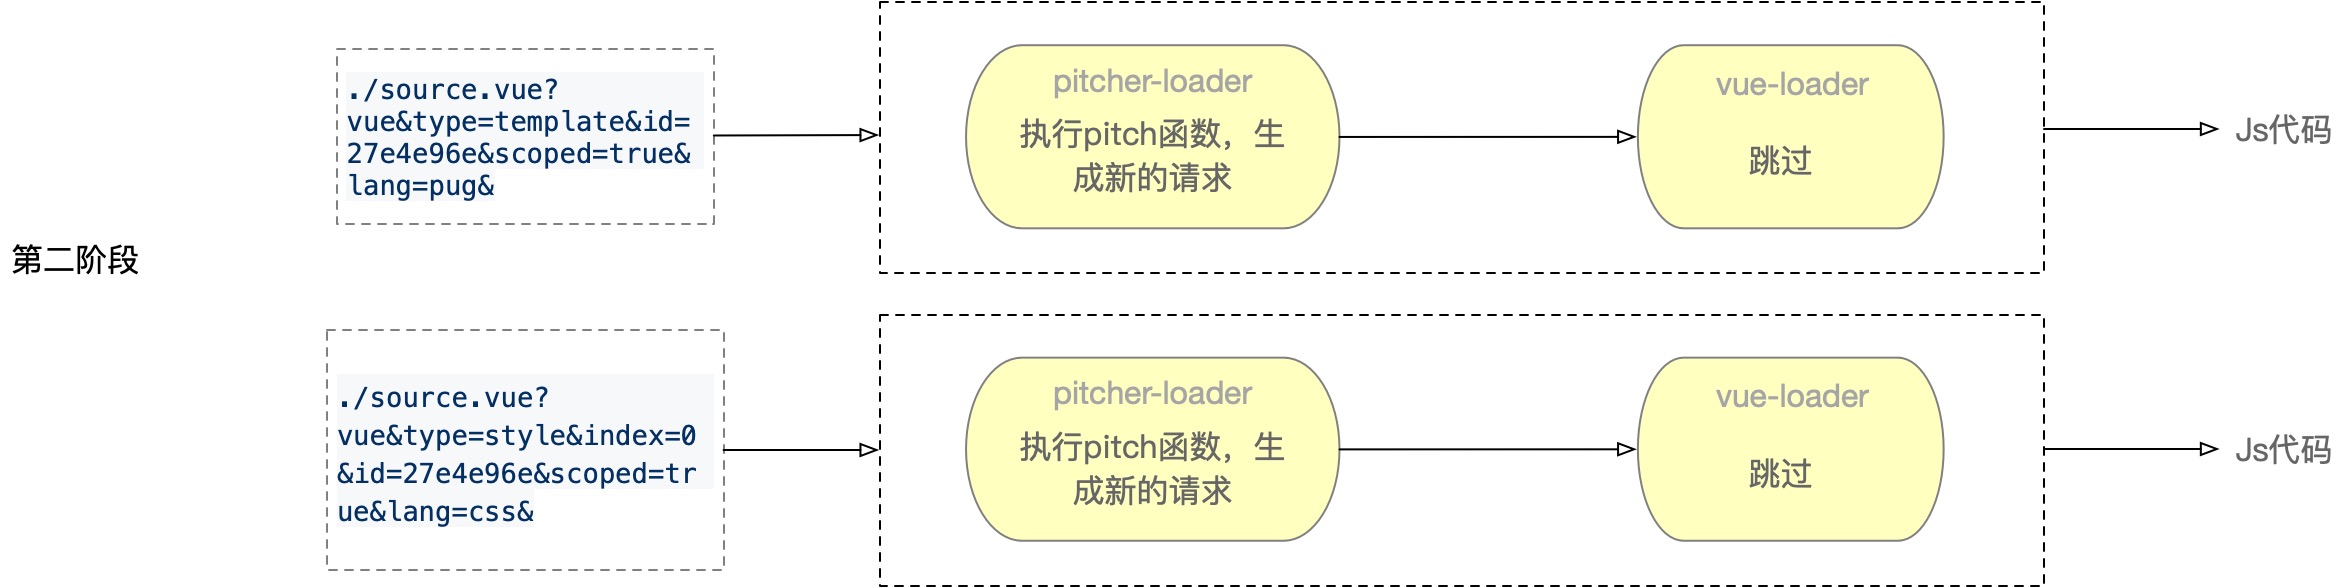
第二阶段
第一阶段返回的js代码交与webpack继续解析,代码里的这几个import请求就会被接着进行依赖解析,这样就会接着请求所依赖的template、script、style、customBlock。
我们以template的请求为例:import { render, staticRenderFns } from "./source.vue?vue&type=template&id=27e4e96e&scoped=true&lang=pug&",webpack解析出这个module需要的loaders是:pitcher-loader、pug-plain-loader、vue-loader。需要哪些loader是webpack内部根据rules来匹配的,这里的rules是经过vue-loader-plugin处理后的。之所以能解析出pitcher-loader,是因为query里含有vue,此时,是时候回过头来看一下vue-loader-plugin中pitcher-rule和pitcher-loader的代码了。
1 | // vue-loader/lib/plugin.js |
从上面代码可以看到,pitcher-rule是通过resourceQuery中是否有vue进行匹配的。从第一阶段返回的代码中可以看到,template、script、style、custom-block的请求query中都带有vue。所以这个rule就是匹配这几个block请求的。如果匹配到了,那么pitcher-loader就会加入到这些请求需要的loader数组中。pitcher-loader来自于vue-loader/lib/loaders/pitcher.js。那我们来看一下这个pitcher-loader到底做了什么:
1 | // vue-loader/lib/loaders/pitcher.js |
pitcher-loader做了三件事情,最关键的是第三件事情:
- 剔除eslint-loader
- 剔除pitcher-loader自身
- 根据不同的query进行拦截处理,返回对应的内容,跳过后面的loader执行部分
对于style的处理,先判断是否有css-loader,有的话就生成一个新的request,这个过程会将vue-loader内部的style-post-loader添加进去,然后返回一个js请求。根据pitch的规则,pitcher-loader后面的loader都会被跳过,然后就开始解析这个返回的js请求,它的的内容是:
1 | import mod from "-!../node_modules/_vue-style-loader@4.1.2@vue-style-loader/index.js!../node_modules/_css-loader@1.0.1@css-loader/index.js!../lib/loaders/stylePostLoader.js!../lib/index.js??vue-loader-options!./source.vue?vue&type=style&index=0&id=27e4e96e&scoped=true&lang=css&"; |
对于template的处理类似,也会生成一个新的request,这个过程会将vue-loader内部提供的template-loader加进去,并返回一个js请求:
1 | export * from "-!../lib/loaders/templateLoader.js??vue-loader-options!../node_modules/_pug-plain-loader@1.0.0@pug-plain-loader/index.js!../lib/index.js??vue-loader-options!./source.vue?vue&type=template&id=27e4e96e&scoped=true&lang=pug&" |
其他block也是类似的。
第三阶段
经过第二阶段后,webpack会继续解析每个block对应的js请求。根据这些请求,webpack会匹配到相应的loaders。
对于style,对应的loader是vue-style-loader、css-loader、style-post-loader、vue-loader。执行顺序就是:
vue-style-loader的pitch、css-loader的pitch、style-post-loader的pitch、vue-loader的pitch、vue-loader(分离出style block)、style-post-loader(处理scoped css)、css-loader(处理相关资源的引入路径)、vue-style-loader(动态创建style标签插入css)。
对于template,对应的loader是template-loader、pug-plain-loader、vue-loader,执行顺序是:
template-loader的pitch、pug-plain-loader的pitch、vue-loader的pitch、vue-loader(分离出template block)、pug-plain-loader(将pug模板转化为html字符串)、template-loader(编译 html 模板字符串,生成 render/staticRenderFns 函数并暴露出去)。
其他模块类似。
会发现,在不考虑pitch函数的时候,第三阶段里最先执行的都是vue-loader,此时query是有值的,所以会进入到selecBlock阶段。(这就是vue-loader执行时与第一阶段不同的地方)
1 | // vue-loader/lib/index.js |
selectBlock来自select.js,那么我们来看看select.js做了什么:
1 | module.exports = function selectBlock ( |
select.js其实就是根据不同的query类型,将相应的content和map传递给下一个loader。
最终生成的代码长什么样?
template最终解析代码:
1 | var render = function() { |
style最终解析代码:
1 | .red[data-v-27e4e96e] { |

一些有意思的代码实现
vue-plugin-loader是如何将rules里配置的规则应用到block里的?
vue-loader-plugin的cloneRules源码:
1 | // vue-loader/lib/plugin.js |
尾声
本文只是梳理了vue-loader的整体流程,具体源码细节请参考我写的源码注释

